Social Icons

Saturday, May 23, 2015

Invite All Friends To Facebook Page By Single Click - 2015 (100% WORKING)

Invite All Friends To Facebook Page By Single Click
Facebook is social media network where we create profile, Pages, groups and events. To interact with people. Normally we use Profiles but for special purpose or for a business we need to create page, group and event. It is not an easy task to grow page, group or any event. The difficult task we face is sending invitation to others to join our page, event or group. Suppose we have 5000 friend so it we task 1 sec for invite every person then we need approx 1,2 hours to complete this task. So don't worry and also don't waste your precious time. Here i going to explain you best way to invites all friend to like your page or invite them to join you even just by single click. Its really easy and best way just by installing chrome extension and start inviting your friends. This is only for working pages and event and you invite them but if you want to invite them into group then this trick is not for you. I already post about


Method 1st:- Invite All Facebook Friend By (Chrome Extension)

  
  • First of you need to install this Google chrome extension. 
  • This extension will provide the feature to invite friend by one click.
Add to Chrome
  • After the installation of this chrome extension small icon will start appearing on the top right side of the browser.
  • Button will only appear when you open Facebook otherwise it will disappear.
Invite All Friends To Facebook Page chrome extension
  • Now login your account whom friends you want to invite to like page.
  • After that open your Facebook page and then click on the Invite all friend button.
  • New pop up window will appear with name of all friends.
  • Then click on the icon of the extension which had installed.
Invite All Friends To Facebook Page chrome extension
  • After that just wait for few second your all friends invite automatically.


Method 2nd:- Invite Friends By Using Script


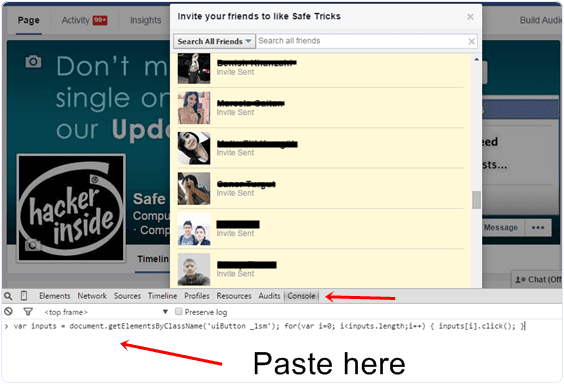
  • First of all open your Facebook page and then click on Invite all friends option and pop window will appear.
  • After that press F12 button on keyboard. Now console window box will appear.
  • Copy below code and paste them in console box.
var inputs = document.getElementsByClassName('uiButton _1sm'); for(var i=0; i<inputs.length;i++) { inputs[i].click(); }
  • After pasting code in console press button and invitation to like page will send successfully.
Invite All Friends To Facebook Page script code
I hope you like this trick to invite all friends just by single to like your page or join event. Don't forget to share with others.

How To Create Social Content Locker In Blogger Blogs

Blogger is a famous and largest free blogging platform. Blogger have lots of features which help us to develop and create an amazing blog. No doubt few years back their was lot of difference between WordPress and blogger. As we can use WordPress as self hosted so it was more flexible because many plugins are available in market. But Now Blogger introduce many features which help to design an amazing blog. Blogger is part of Google Inc. So all the blogs are hosted on Google servers. So we don't have direct access to database. That's why which can do major changes in our blog. We can design our blog in blogger as we want to do We can design SEO friendly, responsive and different layout designs. I already listed many best responsive blogger templates
How To Create Social Content Locker In Blogger Blogs
So today i am going to introduce another advance gadget for blogger users that is Social Content Locked Widget.  By using this widget we can lock any of the content in our blog post with social icons. This plugin is basically consist of Jquery. There are many different styles available for this widget. We can change icons, style as we want to do. But the main purpose of this plugin is only content locking with social button. So here is the way to Add Social Content Locked Widget In blogger blog.

Method To Add Social Content Locker To Blogger


  • First of open your blogger blog and then visit to template Section. 
social content locker for blogger edit template
  • Click on Edit HTML >> In template coding search with Ctrl+f  for </head> code. 
  • After searching </head> code paste below given jQuery just above the code we had searched. If the same jQuery library is available there then don't need to paste jquery again.
 <script src='http://code.jquery.com/jquery-1.10.2.min.js' type='text/javascript'/>

  • After installing jquery now we need to add codes for Social content locker which are given below.
  • Copy the below given code and paste them just below </head> Which we had searched in previous step.

<link href='https://googledrive.com/host/0B_1mqJd2tC8qeDVzSnBJMDh5WUk' rel='stylesheet'/>

<script src='https://googledrive.com/host/0B_1mqJd2tC8qbGdmQzRZVGk3bXM' type='text/javascript'/>

<script type='text/javascript'>
//<![CDATA[
jQuery(document).ready(function ($) {
$('#default-usage .to-lock').sociallocker({

buttons: {order:["facebook-like","twitter-tweet","google-plus"]},

twitter: {url:"http://twitter.com/rafomac"},
facebook: {url:"https://www.facebook.com/rafomac"},
google: {url:"https://plus.google.com/rafomac"},

text: {
header: "Like us To Unlock This Content",
message: "This content is locked. Like us on Facebook, Twitter or Google plus to unlock it."
},

locker: {close: false, timer: 0,},

theme: "dandyish"

});
});
//]]>
</script>


Customizations For Social Content Locker


After Pasting all the above given codes now you need to do little bit customization Which are as following:-
  • Replace the codes by matching color codes given to text in coding and also in below settings.
  • To Change Order of Button Simple The Values With each other.
"facebook-like"
"facebook-share"
"google-plus"
"google-share"
"twitter-tweet"
"twitter-follow"
"linkedin-share"
  • Simple change the button and their order if you want.
  • Now Replace The URL With your own Yours
http://twitter.com/rafomac
https://www.facebook.com/rafomac
https://plus.google.com/+rafomac
  • After Replacing URLs Next step is to replace text for heading and message which will appear on your social locker.
  • Further Step is To Change the Theme of Social Content Locker.
theme: "dandyish"
  • From the above codes replace the value for theme with below given codes.
"flat"
"glass"
"starter"
"secrets"
"dandyish"


How To Add Social Content Locker Into Blog Post


  • After adding and replacing values for all the above given codes successfully.
  • To add social locker within your blog post, copy below code and paste them into HTML tab of blog post.

<article id="default-usage">
<div class="to-lock" style="display:none;">
- ADD YOUR CONTENT HERE -
</div>
</article>

social content locker for blogger in blog post
  • Now Replace the  the - ADD YOUR CONTENT HERE - code with the text, URL, image, video or anything which you want to place behind the social locker. 
  • Now Publish your article and see Social locker working live. If anyone want to access locked content He or she have to share on any of the listed network below accessing content.
I hope you enjoy this article and also like Social Content Locker for Blogger. If you face any kind of difficulties while implementing above given codes feel free to ask me in comment.

Add All Friends To Facebook Group By Single Click - 2015 (100% WORKING with Google Chrome)

add-all-friends-to-facebook-group
Facebook groups are best place for any discussion with your own choice friends or other members. No one from outside can interfere in group without admin permission means groups are totally different from pages. In pages every person is free to like page. Groups can be secret, closed or public. But the problem we face in groups is that, we have to add all member manually one by one. Which is time consuming process. As in my recent post i discuss about Invite All Friends to Like Facebook Pages. Which is helpful for inviting too many friend to Facebook page within few secs and its totally time saving method. But that process is only working Facebook pages not on Facebook groups. Today i will discuss about method to add member in Facebook groups. Sometimes we had an account with 5000 or less friends. So its not an easy task to add too many friends and you face difficulty while adding them one by one. Don't worry we care about your precious and so here is simplest and easiest way which will help you to add friends into group within few min by single click.


Steps To Add All Friends in Facebook Groups


  • First of all Log in into that whose friends you want to invite.
  •  Then open your Facebook Group in which you want to add friends.
  • Now Click F12 button to open debugger and then select console box.
  • Now copy script from below given button.
  • Copy paste the whole provided code and then paste them into console box.
add-all-friends-to-facebook-group-script-code
  • Press enter and process will start for sending invitation.
Note:- Don't worry about anything this script is totally safe. In case you have too many friends then you get blocked for using groups or even your account may get locked. So be careful.
 If Face any type of problem and want any type of suggestion just feel free to share your comment.

Thursday, May 21, 2015

Scanner and Camera Wizard on Desktop in Windows Vista / Windows 7 (100% WORKING)

The Windows Vista®/ Windows® 7 operating system includes the Scanner and Camera Wizard. This software allows you to scan documents and then save those documents as JPEG, TIFF, or other supported file formats. To access the Scanner and Camera wizard, complete the following steps:


SECTION I: Create a shortcut for Scanner and Camera Wizard

  1. Click on the WINDOWS/START button.
     
  2. Search for the keyword WIAACMGR.


    Please make sure you input the keyword correctly. We recommend you copy and paste the text to avoid the misspelling.


  3. Right click on the search result WIAACMGR.
     
  4. Select SEND TO.
     
  5. Click on DESKTOP (CREATE SHORTCUT).


SECTION II: Scan using the Scanner and Camera Wizard

  1. Double click on WIAACMGR SHORTCUT.


  1. If you have multiple imaging devices installed on your computer select your Scanner and click OK.


    • If you cannot find the scanner icon, the scanner driver is not installed. Go to the Downloads section and download and install the latest scanner driver.
       
    • To use the network scanning feature, you need to configure your Brother machine in a peer-to-peer network environment. The network scanning feature does not work in a network shared environment.


  1. Select your scan options under the Scanner and Camera Wizard, then click on SCAN.


  1. Once the scan process is completed, you will be prompted to TAG the scanned image. Tagging the picture will help you search for the files in the future. This is optional and can be skipped.


  1. Press IMPORT.

    For Windows Vista® Users:
    The scanned file will open in the Windows Photo Gallery. To access the Windows Photo Gallery at a later time, click WINDOWS/START -> (ALL) PROGRAMS -> WINDOWS PHOTO GALLERY.

    For Windows® 7 Users:
    The scanned file will open in Libraries. To access the Libraries at a later time, click WINDOWS/START -> Pictures.


Sunday, May 17, 2015

How to Fix svchost.exe using 100% CPU / Memory Leak by rafomac

As a computer technician, here is a problem I have been coming across more and more. About 30secs to 1 minute after booting into Windows the computer starts lagging heavily. When CTRL+ALT+DEL is pressed it shows that svchost.exe is using up maximum CPU resources and only occurs when Automatic Updates is enabled. Microsoft has recognized this problem and has released a patch. However, on all computers I have worked on with this problem, the Microsoft patches don’t fix the problem. This is a guide on how to fix this problem with svchost using maximum CPU.

First of all, to identify if you have this problem you need to press CTRL+ALT+DEL all at the same time, go to the “Processes Tab” and then press “Mem Usage”. If you have this svchost.exe memory leak bug after about 1 minute you will see that the amount of memory usage svchost.exe uses will keep increasing until CPU becomes 99 or 100%. Below is an example of what this looks like:
svchost.exe memory leak shown in Windows Task Manager


How to stop svchost.exe using up 100% system resources (Windows XP Only):


  • Visit the Microsoft website and Download Windows Update v3 WindowsUpdateAgent30-x86.exe and save it to your C:\ drive
  • Download this file fix_svchost.bat (right click and choose save as..) and save it to your C:\ drive
  • Download this file WindowsXP-KB927891.exe and save it to your C:\ drive
  • Reboot the computer and log in to Windows XP in safe mode. To do this, press F8 just before the WindowsXP logo shows up during boot and press up to choose “Safe Mode”
  • Once Windows has loaded and you have the option of which user account to use, log on as “Administrator”.
  • Click Start > Run, choose the Browse button and find the fix_svchost.bat file you saved before, press Open, then OK.
  • A black screen will pop up and white text will scroll past. Wait for this process to finish as it could take several minutes. It will close itself when its finished.
  • Once the black screen disappears, Click Start > Run, choose the Browse button and find the WindowsUpdateAgent30-x86.exe file you saved before, press Open, then OK. Follow the prompts as it installs.
  • When Windows Update Agent finishes installing, Click Start > Run, choose the Browse button and find the WindowsXP-KB927891.exe file you saved before, press Open, then OK. Follow the prompts as it installs.
  • Reboot the computer

Monday, May 4, 2015

മലയാളം എഴുതാൻ ഒരു ആപ്പ് - Type Malayalam easily

How to Disable Auto Download of Audio, Video and Images on WhatsApp by Rafomac

WhatsApp is one of the most popular messaging applications these days. On the play store, this app has been top free for quite a long time. If you are using the WhatsApp to stay connected with the friends, it automatically downloads the images. The user doesn’t prefer the images to be downloaded if the consumer is using the internet connection. Those on the mobile data may have to incur the high charges from the mobile provider.


WhatsApp-Messenger However WhatsApp does offers an option where the user can disable the functionality to download the images and videos. The steps to follow to disable this feature are:
  • Go to Menu button >Settings>Chat Settings>Media auto download
  • The user can choose when the WhatsApp will automatically download the media from chat
  • Simply tap on the option that the user wants to configure and then select or deselect options from image.
If the user does not want to download anything at all, then he or she just has to remove the check mark from all the options and WhatsApp will not download any media to your device.
stop-whatsapp-media-auto-download-1
Images, videos and audio files that are downloaded using this method are stored in the Gallery app. So that’s how we can stop the download of images, audio files and videos on WhatsApp for Android. The option is life saver for ones who want to specify when the data needs to be downloaded. Media Auto download is the feature available for WhatsApp. The messaging service has been on roll lately with updates, support and bringing the features the people want.
stop-whatsapp-media-auto-download-2
Under the settings users in the beta testing group will find media auto download selector. Media auto download helps the user to download the media files to WhatsApp. The users can choose to have images, audio and video based on these criteria.
  • On mobile data
  • On Wi-fi
  • On data roaming
The users can save the audio data and video directly into the phone. The auto save option can be disabled by deselecting the Image, Audio and Video checkboxes.
Now Whatsapp will not save any data and images when connected to mobile data. It saves lot of memory on the phone. This helps the user to free some of the internal storage. Whatsapp makes it easier and quicker to send the messages to the users across the world. Overtime these photos, video and audio messages takes up the space on your device and soon we get the message of not enough space.
WhatsApp is a great and useful app to use. The users can share the data with the friends and family across the world. However to avoid heavy data charges, this disabling function helps to make WhatsApp a great app without causing any heaving charges on the customer. This keeps the customer in control of the images that gets downloaded. It’s an easy messaging client for the users and features like this make it better than others.