Something Mac users often need to do is be able to access files
stored on Windows shares. Here’s a good way to mount those share, and
keep them mounting at login. Mounting the Windows Share
When you are in Finder you can click Go and Connect to Server or you can type Command + K to get to the same menu.
In Server Address you will need to put the location of you Windows share with this format smb://server/share where server is the name or IP address of your Windows machine and share is going to be the folder or drive you want to mount.
If your Windows share requires authentication it will ask you for that info here.
Now if you have Connected Servers showing on your desktop, it will show up on your desktop an in Finder. Making the Share Mount at Login
To keep the share showing up when you have to log out seems pretty
difficult. The internet is littered with ways to write scripts to allow
you to do this. But OS X makes it pretty simple if you are just needing
to add the share to your machine.
You will need to be in System Preferences for this, which you can get
to by clicking on the Apple Menu and then going to System Preferences.
Then you will go to Accounts.
Once in Accounts, you will need go to the Login Items tab. Then you
will just drag the share from your desktop or Finder window into the
Login Items list.
If your share requires authentication, it may be possible to add the
username and password into your keychain with the check box in the
authentication window. Some shares will not work with the keychain
though.
This is pretty nice if you are working a lot between OS X and Windows, and need to move files between the two.
In this guide I explain how to replace the keyboard on a MacBook Pro 13-inch (Late 2011).
According to Apple, the keyboard is part of the palmrest assembly and if the keyboard fails, the entire palmrest assembly has to be replaced.
This is not 100% correct. Of course, you can buy a new palmrest/keyboard/trackpad assembly and replace the whole thing but it’s possible to replace just the keyboard itself.
For this repair you’ll need the following tools:
- T6 torx screwdriver.
- PH0 Phillips screwdriver.
- PH00 Phillips screwdriver.
Also, I would recommend making notes of all removed screws (they all have different length). It will help greatly during the reassembly process.
Before you start, make sure the computer is turned off. STEP 1.
Remove all screws from the bottom cover. Lift up and remove the bottom cover.
STEP 2.
You can leave the battery attached to the case but it’s necessary to unplug it from the logic board.
Disconnect the battery cable from the logic board. STEP 3.
Remove three screws securing the cooling fan.
Disconnect the fan cable from the logic board.
Here’s how to disconnect the fan cable. STEP 4.
Remove the cooling fan. STEP 5.
Now we’ll have to disconnect all other cables from the logic board. I will show how to disconnect them in the following steps.
Cables to disconnect:
1. Speaker/subwoofer cable.
2. Camera cable.
3. AirPort/Bluetooth cable.
4. Optical drive cable.
5. Hard drive cable.
6. Trackpad cable.
7. Keyboard cable.
8. Keyboard backlight cable.
9. Battery indicator light cable.
10. Display video cable.
Here’s how to disconnect the display video cable connector.
Lift up the metal retainer securing the connector and disconnect the cable from the logic board by the black tab.
Connectors 1, 3, 4, 5, 6 and 9 disconnect the same way.
Simply lift up the connector and unplug it from the logic board.
Here’s how to unplug the camera cable.
You have to be very careful with the keyboard and backlight connectors. They are fragile.
Here’s how to unlock the connectors.
Lift up the retainer with your fingernail. The retainer will open up at a 90 degree angle.
After both connectors unlocked, you can pull cables from the connectors. STEP 6.
Remove three screws securing the silver grounding plate and display cable retainer.
Remove the grounding plate. STEP 7.
Remove the display cable retaining bracket. STEP 8.
Here’s a tricky part.
In this MacBook Pro the microphone is glued to the palmrest assembly.
It’s possible to lift up the logic board, unplug the microphone cable, unroute the cable and remove the logic board without separating the microphone from the logic board BUT… it will be very difficult to install the logic board back into the laptop and connect the microphone cable. You might easily damage the microphone cable connector during this procedure.
Here’s an easy way.
Using a sharp object carefully unglue the microphone from the palmrest assembly.
Most likely it will not come out clean and some sticky tape and cushion rubber will remain attached to the cover but that’s OK. STEP 9.
Remove all screws securing the logic board and MagSafe board (power connector board). STEP 10.
Start separating the logic board from the palmrest assembly. STEP 11.
Remove the logic board. STEP 12.
The logic board was removed with the MagSafe board and microphone attached to it.
Now you can see why we separated the microphone from the palmrest assembly in the step 8.
The microphone cable routed very tightly and hard to access. STEP 13.
Remove four screws securing the AirPort/Bluetooth/speaker assembly. STEP 14.
Move the assembly a little bit to the right so you can access one screw securing the optical drive.
Remove the screw. STEP 15.
Remove two more screws securing the optical drive. STEP 16.
Remove the optical drive. STEP 17.
Unroute the speaker cable from the center bracket. STEP 18.
Move the AirPort/Bluetooth/speaker assembly aside. STEP 19.
Remove two screws securing the center bracket.
Lift up and remove the center bracket. STEP 20.
Remove two screws securing the power button to the palmrest assembly. STEP 21.
Lift up the power button. STEP 22.
The power button cable routed under other cables.
Unroute the power button cable. NOTE: the power button is part of the keyboard. When you remove the keyboard the power button also has to be removed.
There is a silver spring located under the power button. Do not lose the spring.
Make sure the spring is in place when you install the new power button/keyboard. STEP 23.
Now the keyboard and backlight ready for the removal. STEP 24.
Start separating the old backlight from the keyboard/plamrest assembly.
The backlight has a few layers. If you plan to reuse the bakclight, make sure those layers don’t get separated. STEP 25.
The keyboard backlight removed. STEP 26.
Now you are ready for the keyboard removal.
There are many tiny screws (about 60) securing the keyboard to the palmrest assembly.
Remove all screws. STEP 27.
Now you can remove the old failed or damaged keyboard and replace it with a new one.
Assemble the laptop following all steps in the reverse direction.
By the way, sometimes it’s possible to repair damaged keyboard keys instead of replacing the entire keyboard.
When I replace the keyboard I always replace the backlight too. It’s easier to install a new backlight than reuse the old one.
It looks cleaner and sticks better to the new keyboard and palmrest assembly.
New replacement keyboards (with or without backlight) for MacBook Pro 13-inch available on eBay.
By the way, if the keyboard failed because of liquid spill, you should go though the liquid spill diagnostic first.
Step-by-Step Guide for Setting Up A Windows Server 2012 Domain Controller
Table of Contents
Overview
INSTALLING AD DS ROLE
PROMOTING WINDOWS 2012 SERVER TO DOMAIN CONTROLLER
Other Languages
Overview
In Windows Server 2012, dcpromo has been deprecated.
In order to make the windows server
2012 domain controller we will install ADDS (Active Directory Domain
Services) role from the server manager on Windows Server 2012.
First we will change the server name let say server2012dc and
the IP address 10.10.21.1 (try to avoid using default 192.168.0.1)
INSTALLING AD DS ROLE
“Before You Begin” screen provides you basic information such as configuring strong passwords, IP addresses and Windows updates.
On Installation Type page, select the first option “Role-based
or Feature-based Installation“.
Scenario-based Installation option applied only to Remote Desktop services.
On the “Server Selection” Page, select a server from the server pool and
click next.
To install AD DS, select Active Directory Domain Services in
turn it will pop-up to add other AD DS related tools. Click on Add Features.
After clicking “Add Features” above, you will be able to click “Next >” as shown in the screen below.
On the “Select Features” Page, Group
Policy Management feature automatically installed during the promotion. Click next.
On the “Active Directory Domain Services” page, it gives basic information about AD DS. Click Next.
On the “Confirmation” Page, You need
to confirm this to continue with this configuration. It will provide
you an option to export the configuration settings and also if you want
the server
to be restarted automatically as required.
After clicking “Install”
the selected role binaries will be installed on the server.
After “Active Directory Domain
Services” role binaries have been installed and now it is time to
promote the server to a Domain Controller.
PROMOTING WINDOWS 2012 SERVER TO DOMAIN CONTROLLER
To create a new AD forest called “ArabITPro.local”, select add a new forest.
Type the name ArabITPro.local
Specify the FFL, DFL, whether or not
it should be a DNS Server and also the DSRM administrator password. As
you can see, it has selected the GC option by default and you cannot
deselect it.
The reason for this is that is the very first DC of the AD forest and
at least one needs to be a GC.
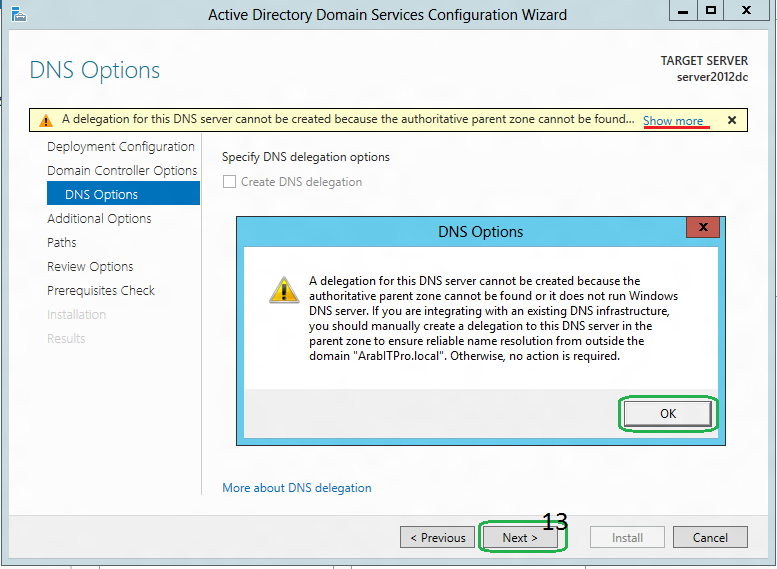
DNS delegation warning.
Checks the NetBIOS name already assigned.
Specify the location of the AD related folders and then click next.
Summary Of All Installation Options/Selections.
Click View script for single command line PowerShell script for dcpromo.
Before the actual install of AD, all prerequisites are checked. If All prerequisite checks are passed successfully then click Install.
When you click Install, DNS and the GPMC are installed automatically.
After the promotion of the server to a DC finished server restart automatically.
Once the server is booted and you
logon to it, click on Server Manager | Tools , will notice that
following have been installed :
• Active Directory Administrative Center
• Active Directory Domains and Trusts
• Active Directory Module for Windows PowerShell
• Active Directory Sites and Services
• Active Directory Users and Computers
• ADSI Edit
• DNS
• Group Policy Management
Please Donate Something to Continue My Free Service
Desclaimer
Neither this site nor the author is endorsing the unethical use of hacking, cracking or any such activities. This site is only for educational purposes.All downloaded are from third party side. This site will hold no responsibility for your actions. It serves as a source of information only.....If you Found anything illegal, Please mail to me rafomac@rafomac.com.............by rafomac


 :::::::::::::::::::::::::::::::::::::::::::
 :::::::::::::::::::::::::::::::::::::::::::