Creating and fixing multi-level numbered headings in Word might seem
to be a bit tricky business for the first time users. Nevertheless, if
you know the correct procedure, this would cease to be a problem. The
following procedure may help you in this regard:
The Procedure
Firstly, we will define the multilevel numbering for the heading levels using
Multilevel List feature.
1. Open the Word document in which you want to apply numbered headings.
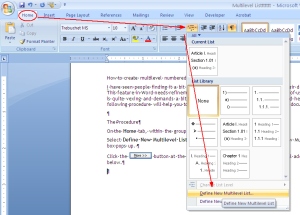
2. From the Word
Ribbon, under the tab
Home and within the group
Paragraph, click the
Multilevel List icon

. A drop-down menu appears.
(Click the image to view in full screen)

2. From the drop-down menu, select the option
Define New Multilevel List (at the bottom of the menu). The “Define New Multilevel List” dialog box pops up.
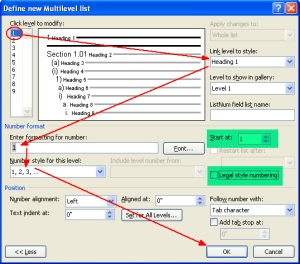
3. Click the
More button (

) available at the bottom of the dialog box. The dialog box expands to show additional fields (see below image).
 Create First Level Heading (or define number format for the first level heading)
4. Click level “1” from
Click level to modify selection box (on the top left hand side of the dialog box).
5. From the drop-down list named
Link level to style, select “Heading 1”. This way, you are linking heading level “1″ (that you will use in your document) to Word’s default
Heading 1 style from the
Styles gallery. Later, you can modify style for each heading as you wish.
6. In this step, enter a numbering format for your heading level 1 in the field
Enter formatting for number from the drop-drop-down list
Number style for this level. So, the format you select from the drop-down list will appear in the
Enter formatting for number field. You can delete the default number format appearing in the
Enter formatting for number field and choose your own.
Important:
a. You can reset the value in the
Enter formatting for number field by selecting a value from the spin box
Start at.
b. If you find the field
Number style for this level as disabled, clear the check box
Legal style numbering.
Creating Second Level Heading
7. Similarly, select level “2” from
Click level to modify selection box.
8. Link level 2 to Word’s default
Heading 2 by selecting “Heading 2” from the
Link level to style drop-down list.
9. Delete whatever appears (by default) in the field
Enter formatting for number to apply a new number format. From the field
Include level number from,
select Level 1 (as a prefix) for the second level heading. Apply a dot
(.) or anything you would like after the prefix number. I prefer a dot.
10. After a dot (.)
, select a numbering format for the Level 2 heading (e.g. 1.1). You are done.
11. Similarly, you can keep adding levels as needed. While
creating the third heading, select Level 1 and Level 2 headings as
prefixes from the
Include Level Number from field and then select a number format for the Level 3 heading (e.g. 1.1.1 ).
The following example shows how to construct the Heading level 4.

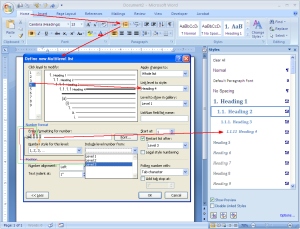
Once you are done with defining number format for all the headings, you can view the same being updated in the
Styles gallery, under the tab
Home, within the group
Styles in the
Ribbon. Or, you can open the
Styles window by pressing
Shift+Ctrl+Alt+S.
Now, select text in your document (which you want as a heading) and
then click the relevant heading style (which you have just created) from
the Styles gallery.
Please note that you may not see all the multilevel heading levels
(that you have just created) in the gallery depending on the
configuration of the
Style Pane Options. You can open the
Style Pane Options dialog box by clicking the
Options link available at the bottom of the Styles gallery pane. See below image.

The
Style Pane Options window appears. Click
Select styles to show drop-down list and select the option
All Styles from the list. Click
OK. Now you can view all the 9 heading levels with multilevel numbering in the Styles gallery.
Modify the appearance of the headings
You can modify the style (font, numbering, etc.) of the headings from the styles gallery by selecting
Modify from the right-click menu of each heading and then clicking the

button from the
Modify Style dialog box.
For example, if you want your Heading 1 to have font “Cambria”, font size “14″,
Bold, color
Blue then configure these in the Modify Style dialog box as shown in the following screenshot.

You can also apply these style by clicking the
Format button available at the bottom of the
Modify Style dialog box and then clicking the Font from the sub-menu. This will display the
Font dialog box where you can apply font styles for Heading 1.
Similarly, you can modify other properties of the headings by selecting the appropriate options from the Format sub-menu.
Please let me know in the comment section if you have any difficulty
understanding the procedure or if you have any other queries. Thank you.


